

Gut Hub Actions is a CI/CD (constant integration and permanent deployment) tool that is made directly in Github. This allows developers to explain FlooseWhich are a series of dynamic steps through events such as Push Code, Opening Bridge Requests, or Release.
For flurry developers, gut hub action is a powerful way to automatically test, construct and deploy in multiple platforms.
This guide will run you through the establishment of Gut Hub Actions for a fluttering project, which will cover everything from the terms to a detailed explanation of the workflow.
The table of content
Why use gut hub’s actions in the development of the flurry?
Gut hub action automated tests ensure that all code changes are verified with the unit and the integration test. Continuous integration automatically produces blowing apps to confirm that the new code is properly integrated.
The code can automatically run to enforce and enforce luntel styling and maintain code standards. Automatic release apps smooth the packaging and distribution process. Customs workflows can be prepared to meet the project requirements. Cooperation has also been improved as the developer can see the results of the workflow directly in the bridge requests.
By introducing the actions of the gut hub, the fluttering projects are more reliable, maintaining and efficient.
Provisions
Before setting gut hub actions for your flurry project, make sure you have:
The fluttering is locally installed of the SD So you can create and test the project before moving the gut hub.
The gut is installed Managing the version control and pushing your project to the gut hub.
A gut hub account And a The new repository Made for your flurry project.
The basic understanding of Yamal syntaxSince the workflose is defined
.ymlFilesA gut hub personal access token (PAT) To release bloods, which will be stored as a reservoir.
Step 1: Create a new blowing plan
Make a new fluttering project and start navigating it:
flutter create gh_flutter
cd gh_flutter
Change gh_flutter With the name of your favorite project. The pre -default structure and dependence begins with a plans.
Step 2: Push the project on the gut hub
Start the gut inside your project and push it on the gut hub:
git init
git add .
git commit -m "Initial commit"
git remote add origin
git push -u origin main
Change
Step 3: Create a Gut Hub Action Workflow
Within your project, create a workflow configuration file. Workflows should be kept in .github/workflows/. Create a file that has a name ci.yml:
name: CI

on:
  push:
    branches:
      - main
  pull_request:
    branches:
      - main

jobs:
  flutter_test:
    name: Run Flutter Test
    runs-on: ubuntu-latest
    steps:
      - uses: actions/checkout@v3
      - uses: actions/setup-java@v3
        with:
          distribution: 'temurin'
          java-version: '17'
      - uses: subosito/flutter-action@v2
        with:
          channel: 'stable'
      - run: flutter pub get
      - run: flutter --version
      - run: flutter analyze
      - run: flutter test

  build_iOSApp:
    name: Build Flutter App (iOS)
    needs: (flutter_test)
    runs-on: macos-latest
    steps:
      - uses: actions/checkout@v3
      - uses: actions/setup-java@v3
        with:
          distribution: 'temurin'
          java-version: '17'
      - uses: subosito/flutter-action@v2
        with:
          flutter-version: '3.19.0'
          dart-verion: '3.3.4'
          channel: 'stable'
      - run: flutter pub get
      - run: flutter clean
      - run: |
          flutter build ios --no-codesign
          cd build/ios/iphoneos
          mkdir Payload
          cd Payload
          ln -s ../Runner.app
          cd ..
          zip -r app.ipa Payload

  build_androidApk:
    name: Build Flutter App (Android)
    needs: (flutter_test)
    runs-on: ubuntu-latest
    steps:
      - uses: actions/checkout@v3
      - uses: actions/setup-java@v3
        with:
          distribution: 'temurin'
          java-version: '17'
      - uses: subosito/flutter-action@v2
        with:
          channel: 'stable'
      - run: flutter pub get
      - run: flutter clean
      - run: flutter build apk --debug
      - uses: ncipollo/release-action@v1
        with:
          artifacts: "build/app/outputs/apk/debug/*"
          tag: v1.0.${{ github.run_number}}
          token: ${{ secrets.TOKEN}}
This workflow has been named CI And that means Continuous integration –
Motivations
In the actions of the gut hub, Motivations Explain the events that cause workflower. This workflow, it, operates automatically when there are some incidents in the reservoir. Specifically, it hears:
push: Whenever a new code is pushedmainBranch, workflow will begin.pull_request: Whenever a bridge application is opened or updated that targets itmainBranch, workflow will also start.
This ensures that the central branch is verified and examined directly through refreshments and bridges applications.
on:
  push:
    branches:
      - main
  pull_request:
    branches:
      - main
When this code operates the flu:
Jobs
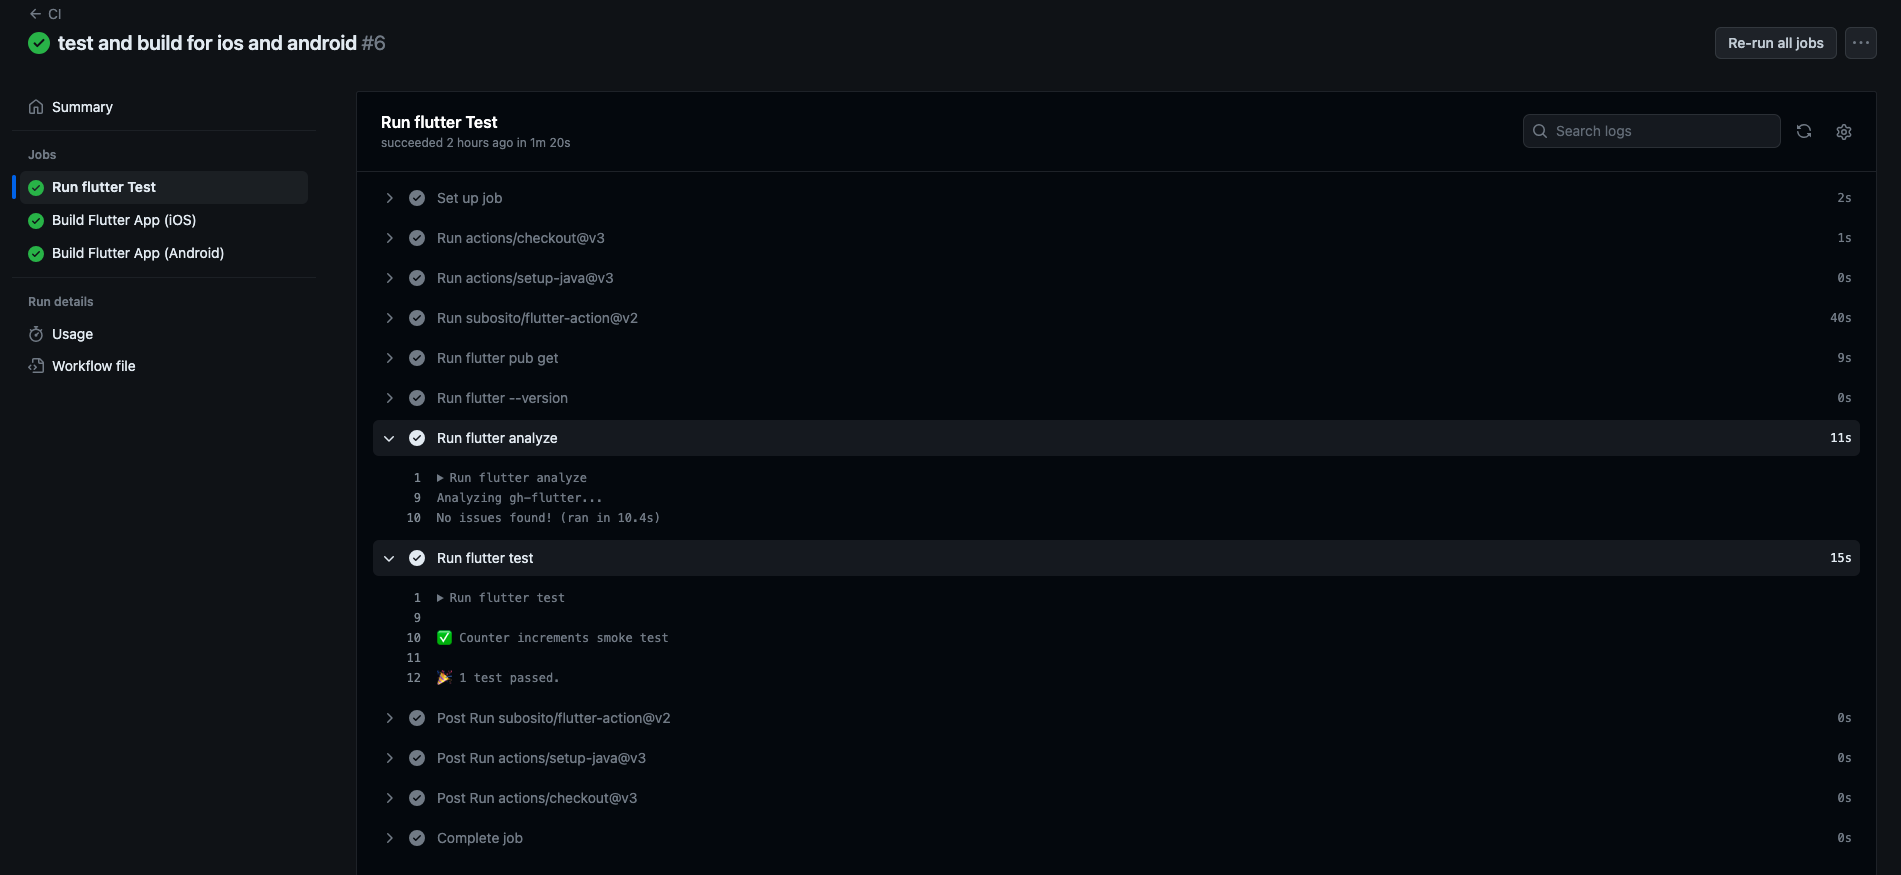
There are 3 jobs in the workflow:
Job 1: flutter_test The unit runs tests and analysis.
jobs:
  flutter_test:
    runs-on: ubuntu-latest
It uses Ubinto As a runner.
The following steps are:
Check -out code:
- uses: actions/checkout@v3Downloads your repo in a runner.
Compires Java (essential for Android Bloods while fluttering):
 - uses: actions/setup-java@v3
   with:
     distribution: 'temurin'
     java-version: '17'
Setting SDK while fluttering:
 - uses: subosito/flutter-action@v2
   with:
     channel: 'stable'
It installs a stable channel.
Runs Commands:
flutter pub getInstalls dependent.flutter --versionThe checks installed the version.flutter analyzeAnalyzes the dart code for errors.flutter testRuns unit/widget tests.
If this work fails, jobs will not be run later.
Job 2: build_iOSApp makes iOS .ipa File
  build_iOSApp:
    needs: (flutter_test)
    runs-on: macos-latest

  steps:
  - uses: actions/checkout@v3

  - uses: subosito/flutter-action@v2
    with:
      flutter-version: '3.22.0'

  - name: Install CocoaPods dependencies
    run: |
      cd ios
      pod install

  - name: Build iOS App
    run: flutter build ipa --release --no-codesign
It just runs After flutter_test Successful and use Macos Runner (iOS is essential for bloods).
After installing the cocoopads dependent, the workflow comes into process flutter build ipa --release --no-codesign. These shell commands flutter to pack your iOS app in one .ipa File inside the runner’s blood directory. --no-codesign The flag allows the building without signing the credentials, which is easy for CI pipelines.
The following steps are:
Sets the checkout repo + java (as before).
Flutter but this time pins:
 flutter-version: '3.19.0'
 dart-verion: '3.3.4'
 channel: 'stable'
Runs Blood:
flutter pub getRecover packages.flutter cleanCleans old construction.flutter build ios --no-codesignMakes the iOS app without signing.After the building:
Goes in
build/ios/iphoneosCreates a
PayloadFolder (essential for IPA structure).The harmony created
Runner.appIPayload.Zip the folder
app.ipa.
Result: A signed .ipa File
Job 3: build_androidApk Makes a debug Android .apk And uploads it as a release article.
  build_androidApk:
    needs: (flutter_test)
    runs-on: ubuntu-latest

  steps:
  - uses: actions/checkout@v3

  - uses: subosito/flutter-action@v2
    with:
      flutter-version: '3.22.0'

  - name: Build Android APK
    run: flutter build apk --release
It runs only after the test is passed.
For Android, after configuring the atmosphere of flurry, makes the workflow call flutter build apk --release. This command sets and packages the Android app in one .apk File is ready for distribution. The resulting file is placed inside build/app/outputs/flutter-apk Project Directory.
The following steps are:
The repo checks, sets Java, and flushes.
Runs:
flutter pub getflutter cleanflutter build apk --debugMakes a debug app.
Upload APK using
ncipollo/release-action@v1:artifacts: "build/app/outputs/apk/debug/*" tag: v1.0.${{ github.run_number }} token: ${{ secrets.TOKEN }}Uploads all debugs as a release sample.
As the issuance of tags
v1.0.(Like,v1.0.5,A gut hub uses Personal access token For,,,,,,,,,, for,, for,,,, for,,,, for,,, for,,,, for,,,, for,,,, for,,, for,,, for,,, for,,, for,,,, for,,, for,,, for,,,, for,,, for,,,, for,,, for,,, for,,,, for,,, for,,, for,,,, for,,, for,,,, for,,, for,,,, for,,, for,,,, for,,, for,,,, for,,,, for,,,, for,,,, for,,,, for,,,, for,,,, for,,, for,,, for,,, for,,, for,,,,, for,,,, for,,,, for,,,, for,, for,.
TOKEN) Repo is safe in secrets.
Step 4: Prepare a gut hub token and add
Android Blood Job issued using APKS release-action. To verify you, you need to provide a gut hub personal access token. To do this, go Gut Hub Settings → Developer Settings → Personal Access token.
Prepare a new token with repo Copy permission and token immediately. Then go to your reservoir → Settings – Secrets – New Storage Secrets. Add the token with the name TOKEN.
Can now use the workflow ${{ secrets.TOKEN }} Safely
Step 5: Understand the Work Flu
This workflow is stimulated when the code is forwarded main Branch or when a bridge application is opened against it. Let’s break it:
The hiring of the trapped test
- Environment: Moves
ubuntu-latest.
Steps:
actions/checkout@v3Source code brings.actions/setup-java@v3Installs Java, some are essential for the tools.subosito/flutter-action@v2Running on the runner.flutter pub getInstalls dependent.flutter analyzeCode issues check.flutter testTest matters run.
This task compiles your code, passes the lining, and there is no failed test.
iOS app construction work
Steps: Similar setups like before, but after clearing old construction flutter cleanIt runs flutter build ios --no-codesign To create an iOS app without the need for a signature certificate. Shell packaged the app in a .ipa File
Android APK construction job
Steps:
They flutter.
Moves
flutter cleanAnd then makes Android APK.Use
ncipollo/release-action@v1To upload APK as the Gut Hub release, as is automatically tagged with versionv1.0..
Step 6: Press the workflow and make it worthwhile
Save your file as .github/workflows/ci.yml And press the changes:
git add .
git commit -m "Add GitHub Actions workflow"
git push
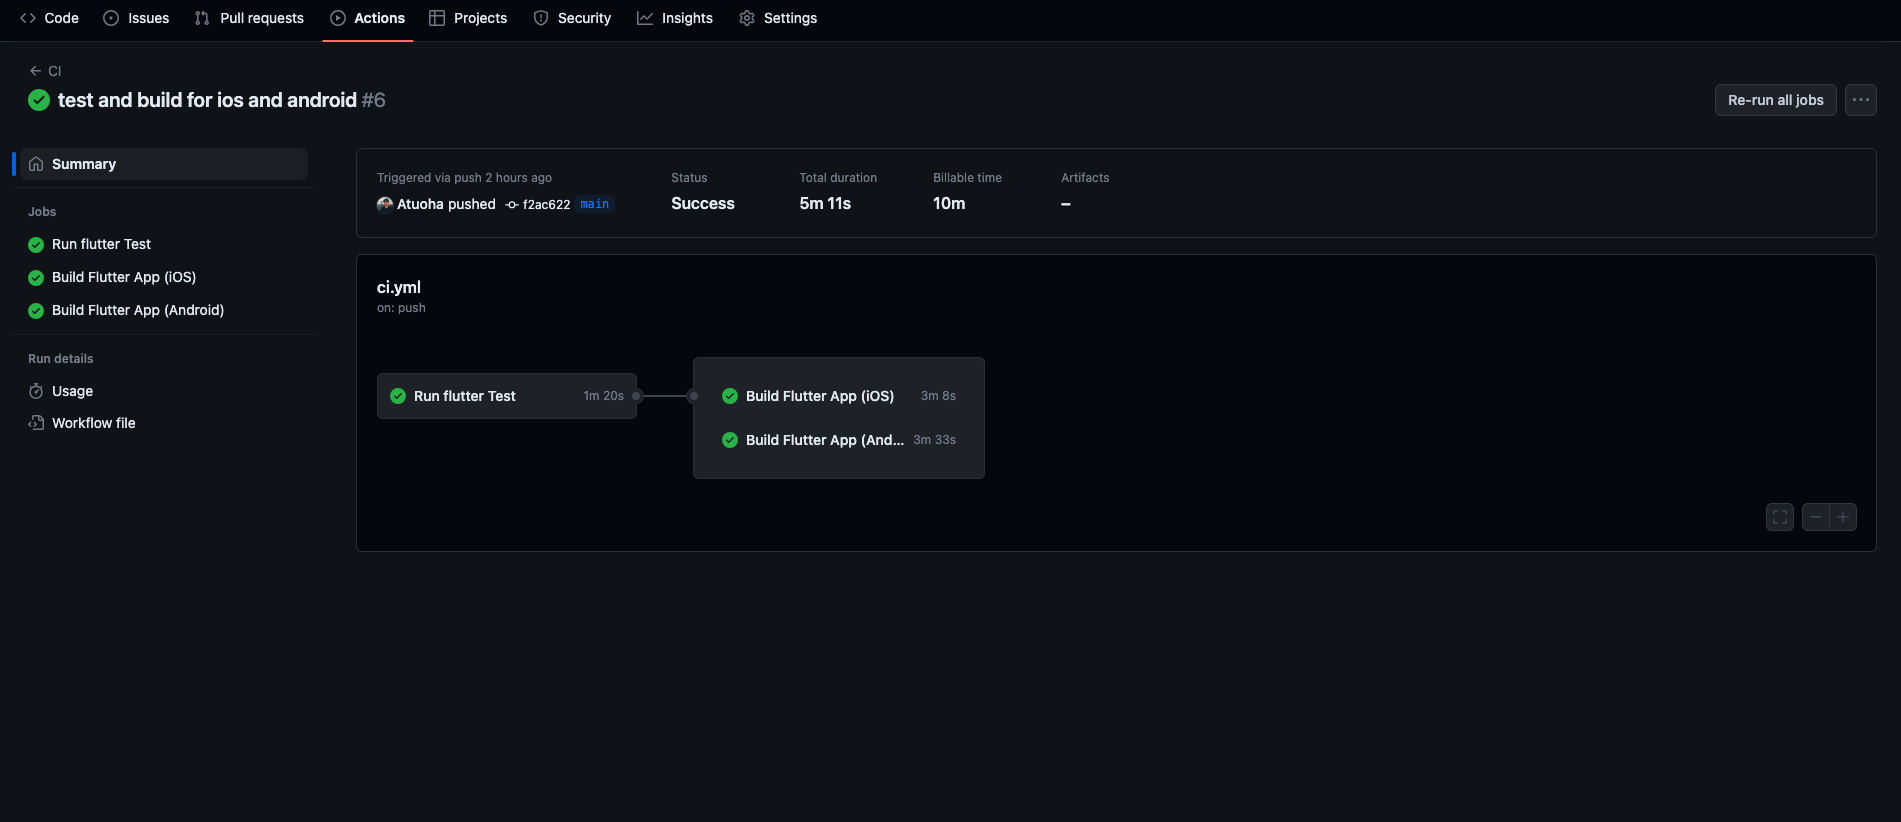
When you push your changes to the gut hub, the workflow file is lifted automatically. To confirm that it is running, open your storage on the gut hub and click on Actions Tab in the upper part of the page. You will see a list of workflowers, each one has linked to the covenant that has mobilized them.
Click the current run to increase the details. In, you will get separate jobs Android And iOS Construction will show its status in every task in real time:
A Yellow dot The “progress” indicates that the job is still going on.
A Green Check Mark “Success” means the work ended successfully.
A Red Cross Being “failed” means something went wrong.
That way, you can immediately tell if your Android and iOS construction has passed or if any of them need attention.


Final notes
With this setup, now you have:
Whenever you push or open the bridge application, automatic testing.
Automatic iOS builds on Macos Runners.
Automatic Android Gut Hub makes with the released app.
This ensures that every change is tested and that construction is permanently developed without manual measures.
For more details, see Gut Hub’s official action documents: https://docs.github.com/en/ACTIONS.