

Navigation is the most important part of any mobile application. Consumers expect that the screens like home, settings, profiles and more will move without interruption.
While the built -in navigation provides using the flurry NavigatorRoute management in large apps can be rapidly complicated. Like the routing packages in the same place Autorot Come in. Authority has paved the navigation by creating a firmly typed pathway, reducing the boiler plate, and facilitating your code base.
This article will guide you through the establishment and use of an autorot in a fluttering project. Finally, you will have a working project that will have multiple screens and the rooting system.
The table of content
Provisions
Before starting, you should be:
Install and formed SDK SDK (The installation guide of the flurry,
Basic Understanding of Vegetarian Vegetables, Stateless Vs State Vegetables, and
NavigatorAPI.Familiar with commands running in the terminal.
An IDE such as Android Studio, VS Code, or Intelligence.
If you already know that there is a way to make a simple fluttering apps, you are ready.
What we will make
We will create an app with four screens:
The control screen: The main screen with buttons to navigate to other screens.
Screen 1, screen 2, screen 3: Easy pages that show navigation.
Our navigation will be fully managed by autorot, which will ensure the structure of the clean and expanded project.
Step 1: Project establishment
Start by creating a new flurry project:
flutter create auto_route_example
Go to the project folder and open pubspec.yaml File add the following dependent:
dependencies:
  auto_route: ^7.8.4

dev_dependencies:
  auto_route_generator: 7.3.2
  build_runner:
Run down command to install packages:
flutter pub get
Step 2: Organizing project structures
Keep your plan organized by the Scale Depression. Create the following folder structure inside lib:
/lib
  /screens
    /sub_screens
      screen1.dart
      screen2.dart
      screen3.dart
    control_screen.dart
  /route_config
    app_route.dart
main.dart
This structure separates the screens from the rooting logic, which keeps the app more intact.
Step 3: Explaining routes with autoTrot
Before we begin to interpret the original screens, let’s set a route configuration first. This file will serve as a map of our app’s navigation: it tells Autoor Which routes exist And Which screens? They should indicate.
Create lib/route_config/app_route.dart And add the following:
import 'package:auto_route/annotations.dart';
import 'package:auto_route/auto_route.dart';
import 'app_route.gr.dart';

@AutoRouterConfig()
class AppRouter extends $AppRouter {
  @override
  List get routes => (
        AutoRoute(path: '/', page: Controlscreen.page),
        AutoRoute(path: '/screen1', page: Screen1.page),
        AutoRoute(path: '/screen2', page: Screen2.page),
        AutoRoute(path: '/screen3', page: Screen3.page),
      );
}
Break the code:
@AutoRouterConfig()“Here is a central routing setting. Please use it to produce the navigation system.”class AppRouter extends $AppRouter:AppRouterOur router is definition.$AppRouterOnce we run the code generation, we will be manufactured by autorot. This includes heavy lifting (such as route classes and helpers).
List
Example:
Right now, these pages (Screen1.pageAnd so) is not yet present. We will create and interpret them in Step 6.
Why does it do this before the screens?
Soon, by explaining the routes, you set up a clear navigation blueprint for your app. Later, when we make screens, we will easily “hook” them with this structure @RoutePage. This helps keep the tutorial logical: First explain the map, then make the destinations.
Step 4: Creating Root Files
To prepare the root files, run:
flutter pub run build_runner build
Or, to see for automatic changes:
flutter pub run build_runner watch
It creates app_route.gr.dart I route_config The folder file contains strictly typed classes for each screen, such as ControlscreenFor, for, for,. Screen1For, for, for,. Screen2And Screen3.
This means that instead of relying on raw wires for navigation, you will use these prepared classes, reduce the bugs from types and provide better IDE automatically.
Step 5: Establishment of Autoor in Main Dart
I main.dartConfirm to use the app itself:
import 'package:flutter/material.dart';
import 'package:flutter/services.dart';
import 'route_config/app_route.dart';

void main() {
  runApp(const MyApp());
}

class MyApp extends StatelessWidget {
  const MyApp({super.key});

  @override
  Widget build(BuildContext context) {
    final appRouter = AppRouter();

    SystemChrome.setSystemUIOverlayStyle(
      const SystemUiOverlayStyle(
        statusBarColor: Colors.transparent,
        statusBarIconBrightness: Brightness.dark,
      ),
    );

    return MaterialApp.router(
      title: 'Flutter AutoRoute Example',
      theme: ThemeData(
        colorScheme: ColorScheme.fromSeed(seedColor: Colors.brown),
        useMaterial3: true,
      ),
      routerConfig: appRouter.config(),
    );
  }
}
Key points in this code:
Step 6: Creating screens
In a flock, each page or part of your app is usually represented by one Screen. The screens are only widgets (usually wrapped in A Scaffold) This page contains UI and logic. Since we are using autoThrot, every screen on which we want to visit should be interpreted with @RoutePage.
@RoutePage The interpretation told Auturot, “This widget is a way. Please add it to the route system prepared.”
Without this interpretation, the autorot will not know about the screen, and you will not be able to visit it using the router.
Screen 1.dart
import 'package:auto_route/annotations.dart';
import 'package:flutter/material.dart';

@RoutePage(name: 'Screen1')
class Screen1 extends StatelessWidget {
  const Screen1({super.key});

  @override
  Widget build(BuildContext context) {
    return Scaffold(
      appBar: AppBar(title: const Text('Screen 1')),
      body: const Center(child: Text('Welcome to Screen 1')),
    );
  }
}
Break the code here:
@RoutePage(name: 'Screen1')This interpretation registers the widget as a usable page.
nameParameter gives autoor a clear identifier for the screen, which also reflects in the createdapp_route.gr.dartFile
class Screen1 extends StatelessWidgetThe screen describes the state as a widget as it has no dynamic condition in this example.
LO you of more complex pages (such as form or dashboards), you can use
StatefulWidget.
ScaffoldAppBar(title: const Text('Screen 1'))- Shows a top app bar titled “Screen 1”.
body: Center(child: Text('Welcome to Screen 1'))Handle the text in the middle of the screen.
In real applications, this is the place where you will add your widgets (lists, form, dashboards, and so on.
Repeating for other screens
Follow the same structure for the same Screen 2 And Screen 3:
Create
screen2.dartAndscreen3.dartInsub_screens.Interpret with each class
@RoutePageAnd give it a unique name (Screen2For, for, for,.Screen3,Refresh within the UI
bodyTo reflect what this screen is.
For example:
@RoutePage(name: 'Screen2')
class Screen2 extends StatelessWidget {
  const Screen2({super.key});

  @override
  Widget build(BuildContext context) {
    return Scaffold(
      appBar: AppBar(title: const Text('Screen 2')),
      body: const Center(child: Text('Welcome to Screen 2')),
    );
  }
}
Why is this important?
Auturot scans and finds your project @RoutePage The interpretations then creates a strictly typed navigation class so you can write context.router.push(const Screen2()) Instead of manually typing the root door '/screen2'. This eliminates the human error (such as typos in the root wires) and makes it easier to maintain navigation as your app grows.
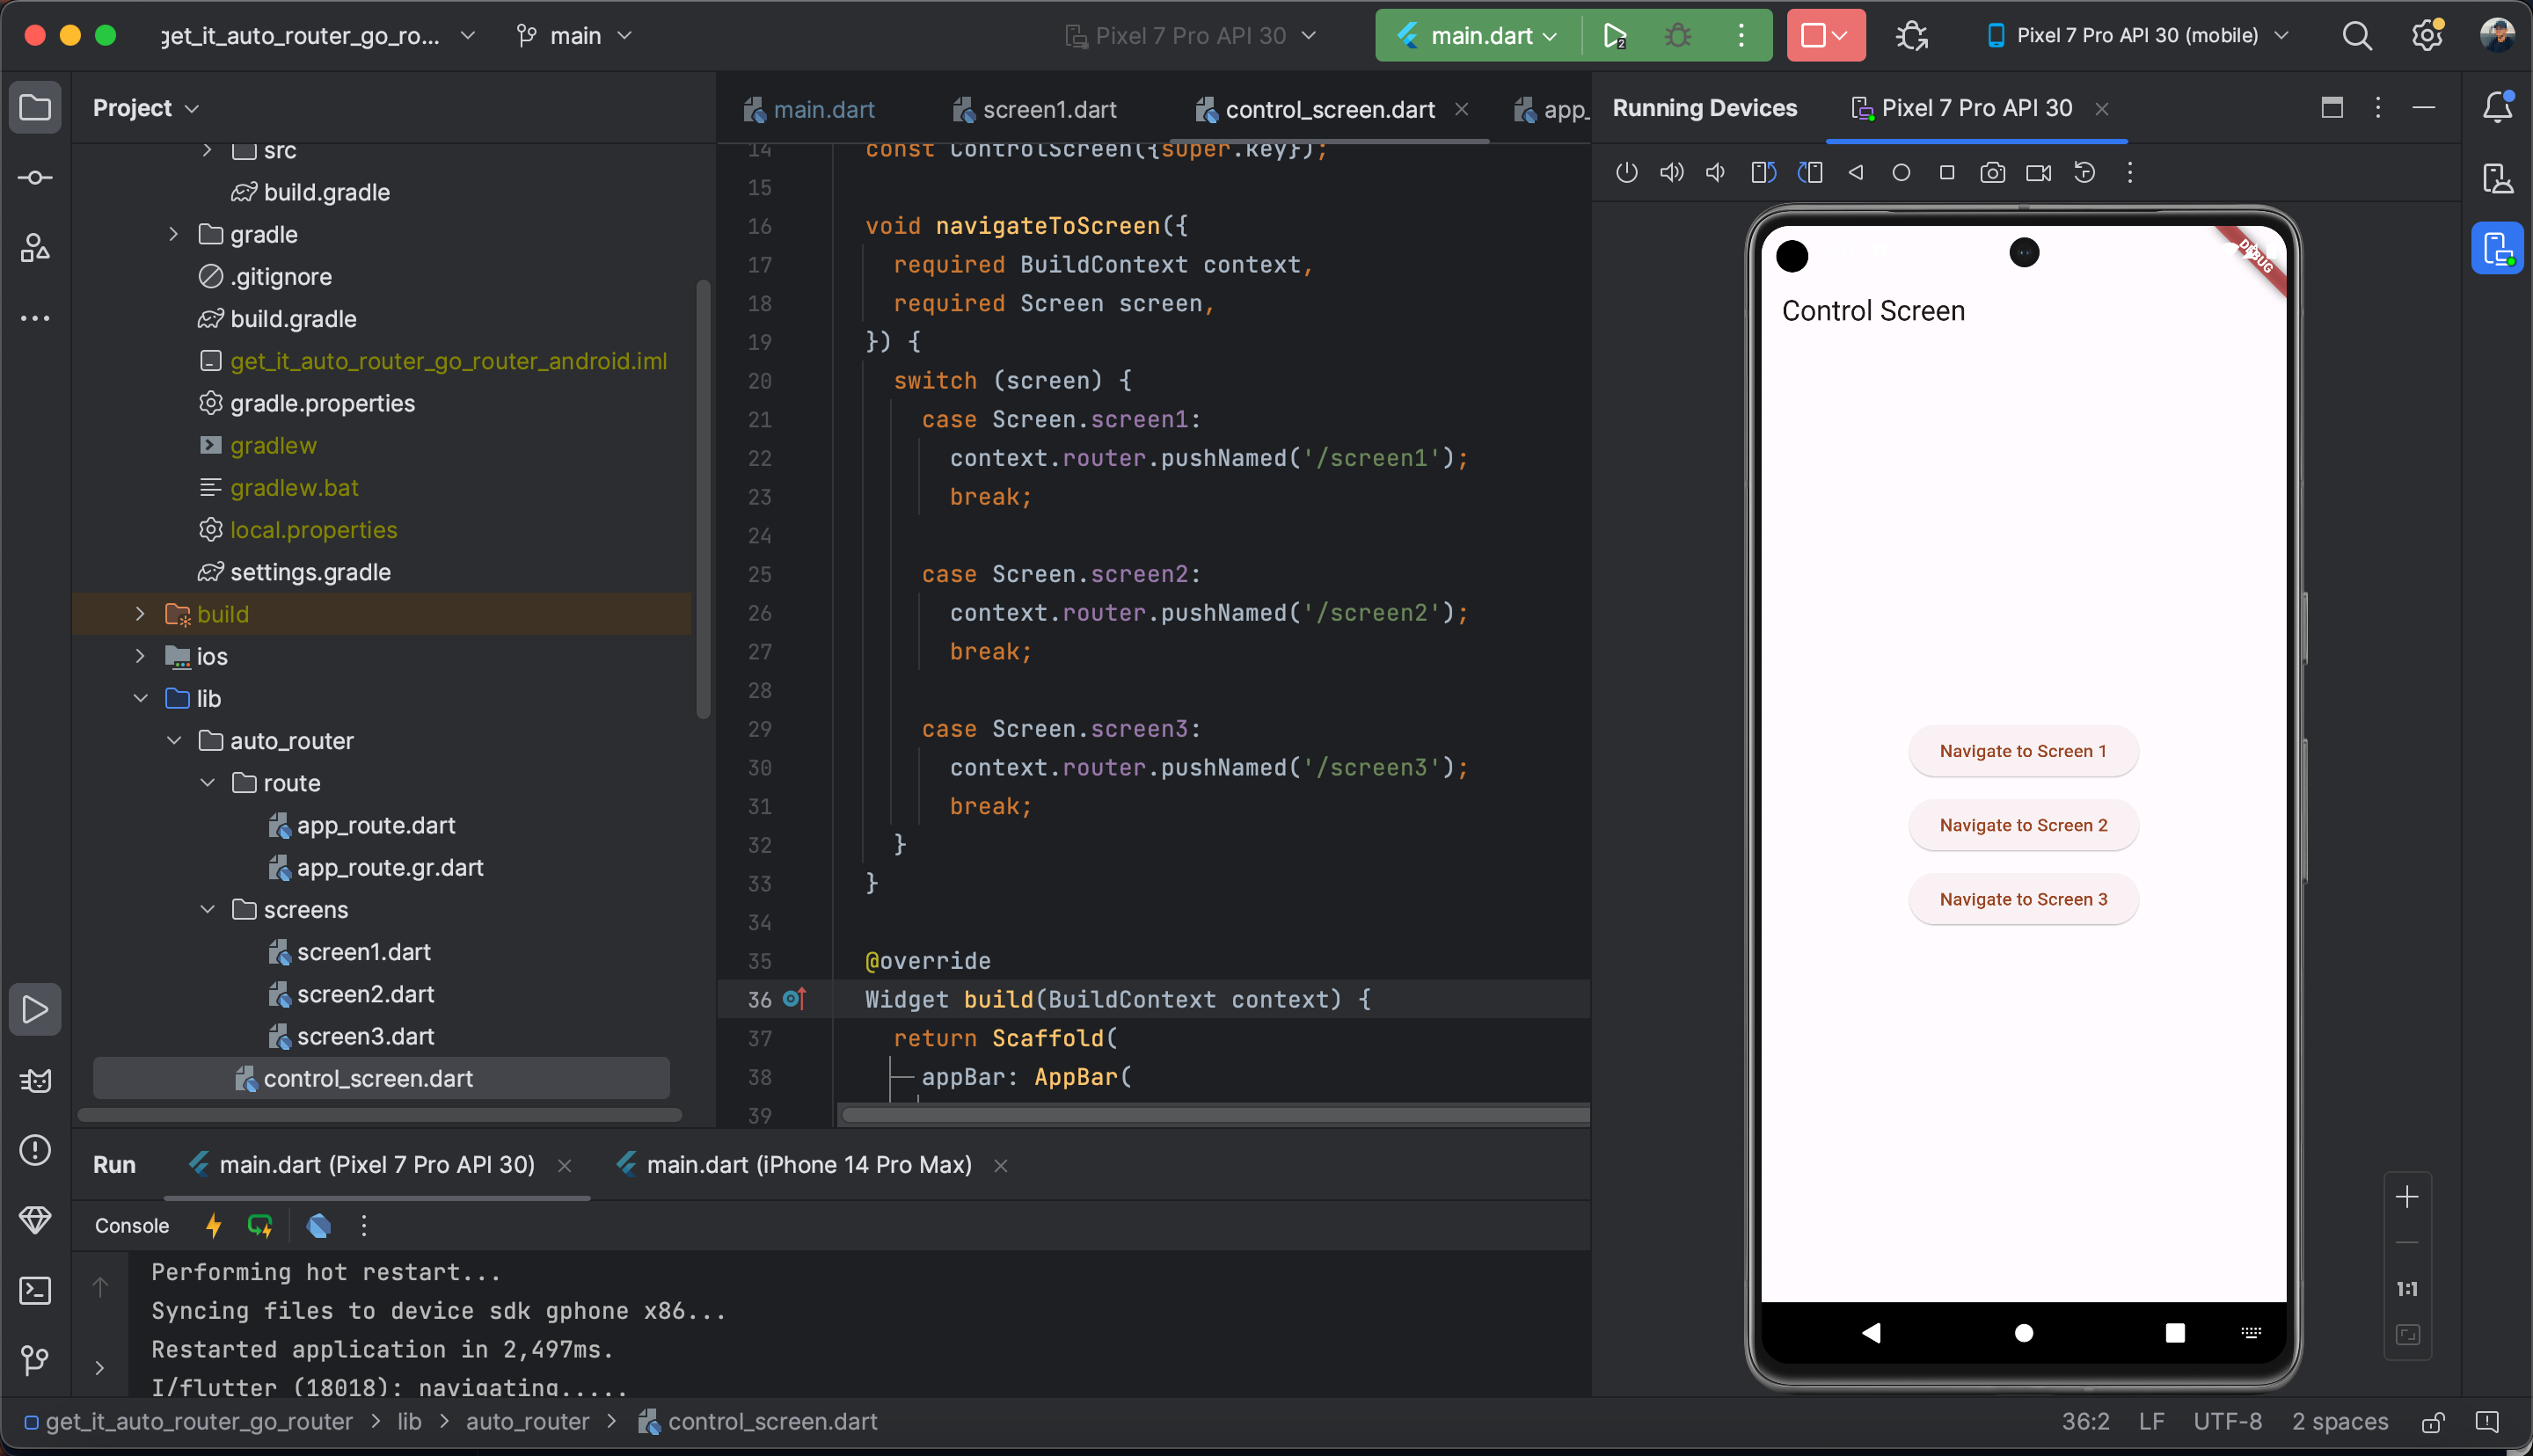
Step 7: Control screen
The control screen Works as our app’s entry point. This is the first screen that loads when the app begins (because I app_route.dartWe set / > Controlscreen,
This screen does not show any complex content, instead, it provides buttons to navigate to other screens. Think about it a Menu Or Dashboard Which attracts you to other paths.
import 'package:auto_route/annotations.dart';
import 'package:auto_route/auto_route.dart';
import 'package:flutter/material.dart';

enum Screen { screen1, screen2, screen3 }

@RoutePage(name: 'Controlscreen')
class ControlScreen extends StatelessWidget {
  const ControlScreen({super.key});

  void navigateToScreen(BuildContext context, Screen screen) {
    switch (screen) {
      case Screen.screen1:
        context.router.pushNamed('/screen1');
        break;
      case Screen.screen2:
        context.router.pushNamed('/screen2');
        break;
      case Screen.screen3:
        context.router.pushNamed('/screen3');
        break;
    }
  }

  @override
  Widget build(BuildContext context) {
    return Scaffold(
      appBar: AppBar(title: const Text('Control Screen')),
      body: Center(
        child: Column(
          mainAxisAlignment: MainAxisAlignment.center,
          children: (
            ElevatedButton(
              onPressed: () => navigateToScreen(context, Screen.screen1),
              child: const Text('Navigate to Screen 1'),
            ),
            const SizedBox(height: 10),
            ElevatedButton(
              onPressed: () => navigateToScreen(context, Screen.screen2),
              child: const Text('Navigate to Screen 2'),
            ),
            const SizedBox(height: 10),
            ElevatedButton(
              onPressed: () => navigateToScreen(context, Screen.screen3),
              child: const Text('Navigate to Screen 3'),
            ),
          ),
        ),
      ),
    );
  }
}
Code -step -up error:
@RoutePage(name: 'Controlscreen')
enum Screen { screen1, screen2, screen3 }We describe an insomnia for our target screens.
This pose a navigation procedure cleanly at risk of errors by cleaning up and typing raw wires in numerous places.
navigateToScreen(BuildContext context, Screen screen)A helpful method that checks Which screen do we want (Based on Anum) and then call
context.router.pushNamed('/screenX').context.routerIt comes from autorot, it gives you access to the app’s navigation stack.pushNamed('/screen1')Mails by the way we had previously appreciatedapp_route.dart:AutoRoute(path: '/screen1', page: Screen1.page),Thus the button → Way → Route connection works.
UI Layout (
ScaffoldJes
Example:
Button 1
navigateToScreen(context, Screen.screen1): Navigate/screen1.Button 2: Navigrates
/screen2.Button 3: Navigrates
/screen3.
How does it work together
App Start: Router load
/Which indicatesControlscreen.The user taps a button:
navigateToScreen()Runs and callscontext.router.pushNamed('/screenX').Is matching the autoTrot path: It looks
/screenXIn the route list we describedapp_route.dart.Eliminates the developed code:
app_route.gr.dartCreates and pushing the right screen widgets on the stack (made by Authorot).
Result: Navigation works without writing manually Navigator.push The boiler plate autootic handles everything for you.
Screenshots


Best processes when using Autoorrot
Always organize routes in a dedicated folder (
route_config) Separating concerns.Use firmly typed routes (created classes) instead of raw wires. For example, use
Screen1()Instead of'/screen1'.Badal nasal routes for complex apps (eg, tabs, verification flow).
To protect these routes, use guards in Auturot that require verification.
Keep the screens free, avoiding navigation logic within the screen widget as needed.
Conclusion
The autorot boiler plate code, ensuring the type of safety, and facilitating navigation in fluttering applications by offering modern features such as nashed navigation and guards. With clean project structures and excellent methods, you can confidently measure your app by fluttering.
Refer to the official documents of deep learning and advanced features:
Auturot on PUB.DEV