
Despite my initial reservations I changed comfyui At the end of 2023 and never looked back. 2024 has improved (wider) improvement in functionality and features (yes).
So this post is helping you to eliminate any problems or fears of learning Comphyui-because it is incredibly powerful and there are many additions available (we will discuss them later).
If you have a GPU that has a VRAM 8GB (minimum recommendation), you can install Comphyui locally. This is not your PC RAM but a remembrance of your GPU (graphic processor unit).
to install comfyui
Local Install
- Method 1 – You can install Comphyui as pre -peeled blood for Windows via direct download link. Just get out Zip file (Using 7 zipper) And you can run the run_nvidia_gpu.bat file to launch comfyui.
- Method 2 – You can Install Panukivo A simple GUI application that has built a one -click installation for many AIApp. including comfyui. Panuku is available for Windows, Mac and Linux
- Method 3 – from manual install comfyui gut hub page.
Rinpad Install – Cloud GPU
Locally running alternatives requires to spend some initial funds to discover the Comphyui space, the beauty is that you can start with less than 40 0.40 per hour. People provided by the cloud GPU, such as Rinpad, mean that you are running an example of comphoi in the cloud and as long as your pod is available, it will run and in the end you can delete the pod, note that if you do not delete the run pod, you are still using some storage charges.
Each of them will start using you with the use of Kamfi because they will already install with it. However, you need intermediate skills in technology to discover this option.
My recommendation
Local is better because there is no time limit and ease of use is high. I started with method 1 and then went to method 2, so if your GPU is able to cooperate, I will recommend it.
Kamfai is running
Comph with a command prompt/terminal is quite easy launch python main.py Which will start your Comphyui interface and you should get a link at the end of the script. Do not close the command prompt/terminal window where you launch the script or else you will mistakenly remove the application.
After successful launch you will find like URL
Click the URL to open the site in your favorite/default browser.
Understand the Comphyui Interface
As I said in the introduction of many advances in 2024, the interface is even more featured and easy to act. Read the UX design below as I cover different buttons and default interface features.

Top Navigation Bar
This Top Navigation Bar contains comfyui menu Where you can secure/open workflows, modify and clean the workplace (this is the gray area in the middle where the workflow is), there is also a help menu when you need help. Then you have like a browser Tabs Where every work flu is opened, it can be changed. To your right Toggle the lower panel Which shows you the logs of the comedy because it operates your workflow, it’s good to see what is happening under the hood and also to see what has been wrong if something happens. Finally the Burger icon ☰ ☰ As is often referred to as a toggle switch that will happen All MRANUSE on/Turn off.
Left navigation bar
Come this bar, browse you in a row, node library, model library, workflow.
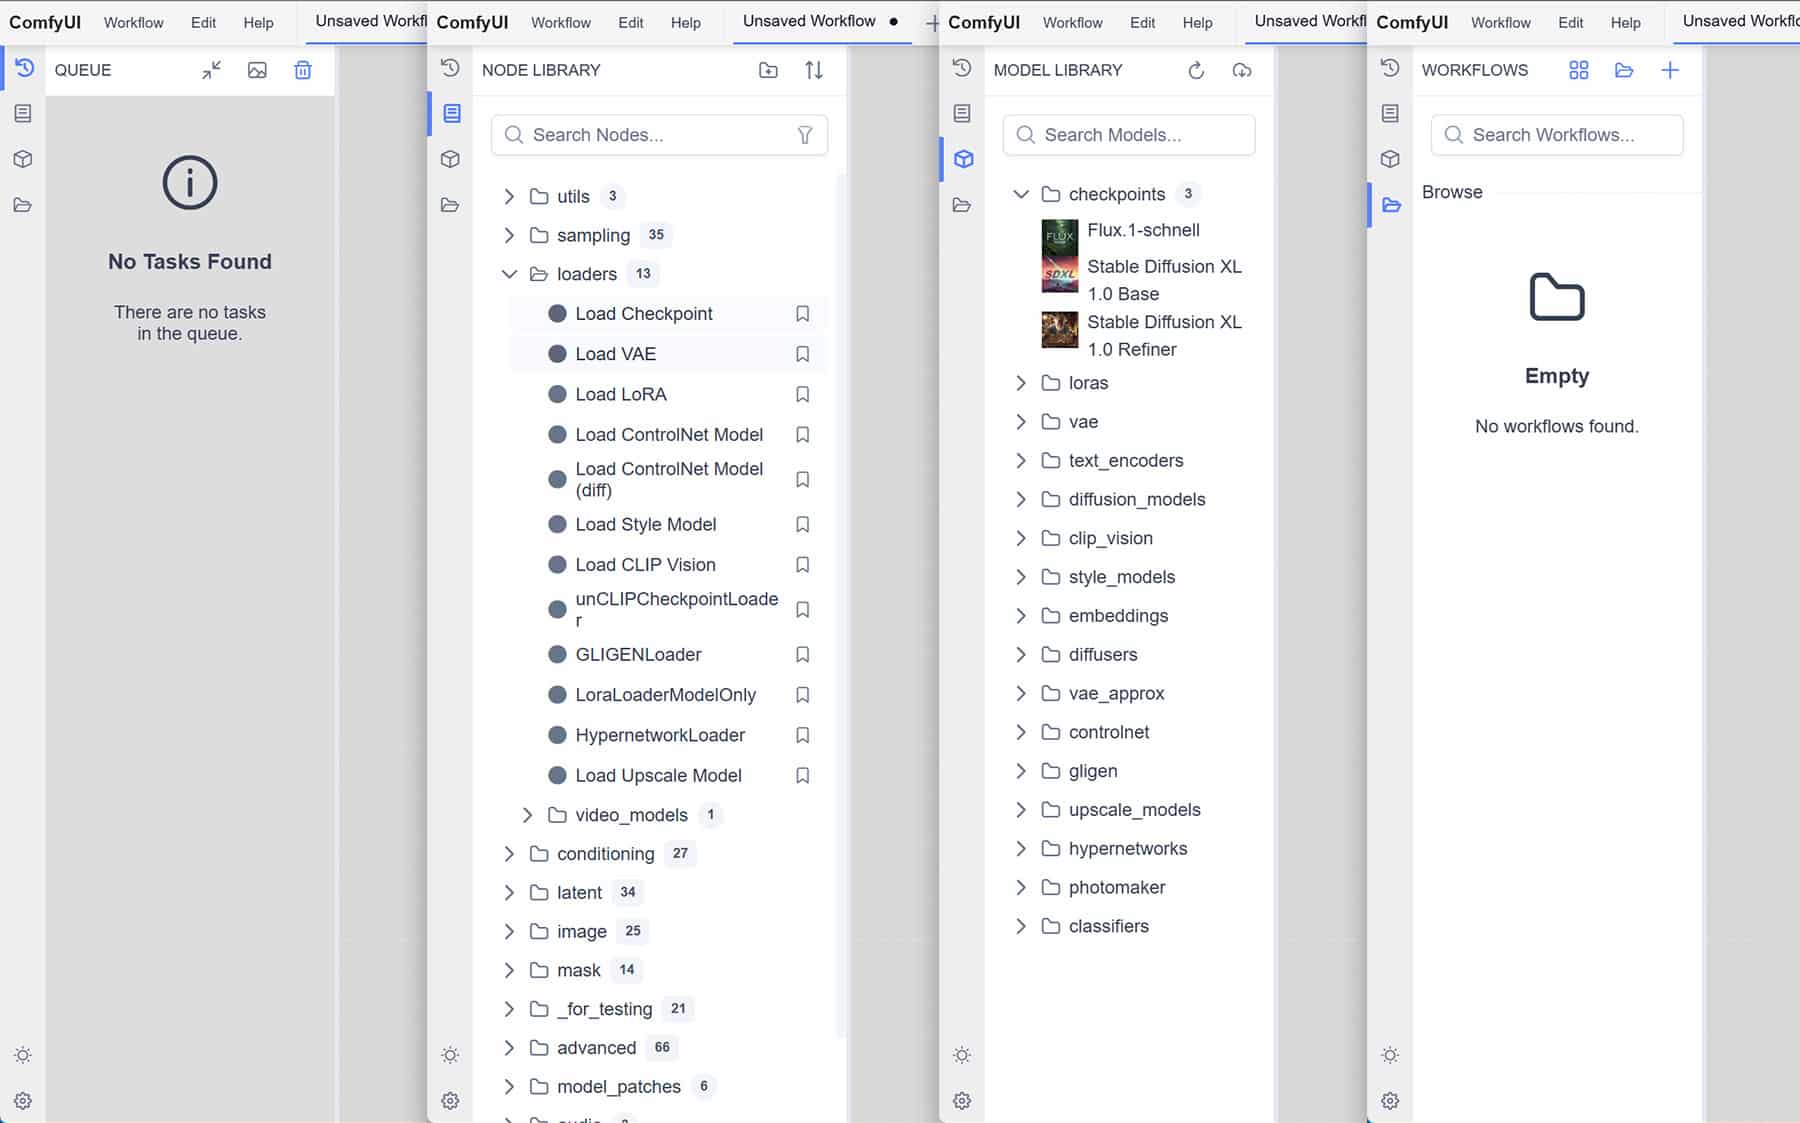
- Row – This shows current work and past works.
- Node library – Let’s browse the nodes that are used to create workflows. You can browse through category folders or find it through a search bar.
- Model Library – Browse you to download what model checkpoints you have as well as new things, including other things such as Loras, Control Net, Clip Vision etc.
- Floose – Let’s browse your workfloose folder so you can access your stored workflow, as well as some sample workflow.
This left navigation bar is a way to do the light/dark work of your environment towards the lower end. Gear icon is your specific Settings The menu where you can fix the Comphyui settings. There is no such thing you do not have to find at the beginning, but it’s definitely good to know where to find it.

Swimming bars down
At the bottom you have a floating bar that can be moved around and they click on the queue button and queue new tasks. At the same time, you have a lot of work that indicates that it will run 1 or more times. Then you have an X -icon that will only cancel the “current” work, but with the ▢ icon you can clean the entire line of pending work. Your workflow is implemented from the beginning to the end.
Row The button also has other functions, where as a default, it will queue the work when it is clicked. Other options are:
- Row (Instant) – which will put a work queue after one work until you turn the button by stopping Row.
- Row (on change) – When you change the workflower, what works. For example. You turn the prompt to a green galaxy bottle from a galaxy bottle of purple galaxy. Or if the seed changes after the generation, it will lose another task. Once again to disable this generation L you need to turn back the button back Row.

The bottom right tools bar
This bar gives you some good tools that let you go on the screen. + And – clear zooms are their/zoom -out features that will allow you to zoom in or outside the workflow screen. When you have a default workflow, it may look unnecessary but as you find that your workflows will usually increase in size and you will experience and find more in the Kamfi world.
⛶ Come on, let you either fit to see the entire workflow if the node is not selected or if a group of nodes has been selected, it will be in line with the screen.
➤ یکن Let’s select and click on the nodes to change them. Clicking on this ➤ icon will change what will allow you to move the workflow area on the screen to the screen. Click back to the icon to bring it back.
My recommendation is to use the space bar key to suppress and move the workflow area, or click and drag the workflow.
👁 The icon will togel between showing or hiding the links to you. If you are a little OCD, you will find links that are often called spaghetti when you develop your workflow. This can be a good relief for the eyes that are not watching the links.

Comphyui Manager
The Comphyui Manager is one of the first addition to your need after installing the Comphi, it must be. COMFYUI Manager Let’s browse through the customs nodes’ library (Comphyui components) that will add more abilities to your workflose.
If you install your Comphyui environment through Panaku (method 2) then it will be installed, however, if you have installed (method 3 or 1), it cannot be added. So you should install it after your previous post that how to install the Comphyui manager, I also have a 2 -minute short video.
https://www.youtube.com/watch?v=ltmbjazoifq
For example workfloose
Comphyui comes with a lot of examples of work flu. A workflow is a combination of the Cocherry Nodes that are connected to accomplish a task, like it is a prescription you have created and can share it with others.
You can find our site and check out our site of different comphyui workflows A lot of instances The writer of Kamfai shared
Workflows are usually exported to JSON format (text -based file) or PNG if a photo is produced from the workflow. PNG usually embeds the workflow inside it, once again if you open a PNG in the text editor, you will see the JSON format code at the beginning of the file.
It also makes it easier to export and share your workflow with others in society.
Red Box Error in the Work Flu
Often when you download the example flu from our site or other standard examples, you may find that the workflow burden is burdened but then you find a popup error that is called “lost” nodes and you get something like this after you admit the error.

This means that there are some nodes that use workflows that are not installed in your Comphyui environment. So the easiest way to solve this is to open the Kamfi Manager. If this is installed, it will appear in the top menu bar with the Manager button. Click on what will open a dialog where you will see a button Install the lost customs nodesClick it to move forward.

It will automatically be filtered on the disappearance of the nodes, which shows that the workflow uses them under custom nodes that are not installed in your comphyui. To install them all, click on the items individually or check them out and click the Install button below.

At the end of the installation you will be asked to restart Comphyui, this is absolutely important.

If you have not closed your browser tab after restarting, you should hit the Ref Refresh to reload the workflow. All nodes should now appear correctly and you should be able to run imported workflows.

Conclusion
At the same time, you are ready to find a wonderful world of Kamfi and experience with different workflows. We have covered the foundation for installing Comphyui, understanding its details, including installing the Comphyui Manager and fixing the general error of the lost nodes. Don’t forget to check our Utube channel Where we have enough content on Comphyui.
There are many articles on the site, please check them too.
If you have any questions, please do not hesitate to reach us through the comments below or through our social links.
If you want to support our site please consider buying us FiFor, for, for,. Catch a product Or Subscribe. Fast GPU is required, access the fastest GPUS for less than $ 1 per hour runpod.io